Thursday, April 29, 2010

Vinyl Craft Lettering {Giveaway}

So I just found out about this giveaway and I am so excited to share!

Vinyl Craft Lettering is giving away 3, yes THREE gift certificates:


Grand Prize: $120.00 Gift Certificate to Vinyl Craft Lettering

First Prize: $60.00 Gift Certificate to Vinyl Craft Lettering

Second Prize: $30.00 Gift Certificate to Vinyl Craft Lettering

Click here to check out there designs!  My breakfast area is in need of something I think vinyl lettering would be purrrfect!  Or maybe in the girls' rooms, or bathroom.  Or the guest bedroom....Too many choices!


Enter here!

Market Totes

I am sooo excited!  I just got my order from Wholesale Boutique (formally Silver Wholesale of Myrle Beach) which included a new style of market totes for me to embroider.  I ordered the pink damask flower for myself and of course it was the first one I did! 


Step One: Create your design with an embroidery software.  I have been using Stitch Era Universal because it was free (with a $20 tutorial at My Embroidery Mentor).  I would like to try out the SewWhat Pro in the near future too.  When I create the design I add a quick basting stitch first in order to securely tack down the ackward tote to the hoop in order to prevent it from moving while stitching the design since you can not hoop a market tote.  You can purchse basting stitches or I downloaded it free from Sew Forum.  ALWAY test stitches you download for free before you use them on an embroidery blank as you never know the quality!

Step Two:  Hoop your stabilizer. I used a light weight tear-away stablizer.  Insert your hoop on your machine.

Step Three:  Remove the frame from the tote and turn it inside out.  The feet on the bottom should now be the bottom of the tote if you are looking down into it. Make sure the velcro strapes are velcroed into place so that they don't accidently get caught in your design.

Looking into the tote.

Step Four: Insert the market tote on it's side with the top of your machine almost touching the bottom feet of the tote.  I use the grid and place it on top of the tote to see the boundaries, line it up straight.  The totes from Wholesale Boutique are nice because they have 3 velcro straps so I just lined up the center of the hoop grid with the middle strap.  Also make sure the velcro straps are out of the path of your design so that you don't sew them together.  You can not do a perimeter path on these because the whole tote will move due to the size and bulkiness of the tote.


Step Five:  Hold the tote down with your hand, after you lined it up and start your basting stitch.  I keep my hand on the tote at all times while sewing the basting stitch to ensure that it doesn't bunch or move as it is stitching.  Once the basting stitch is down you are good to go!  AK Designs Boutique sells basting stiches for all types of machines.


Step Six: Stitch the remaining design.


Step Seven: Remove the hoop from the machine.  Leave the tote stitched to the hoop (makes it easier to remove the basting stitch).  Using a seem ripper, rip the basting stitch about every 4th stitch.  Tear away the stabilizer and hoop.


Step Eight:  Turn the tote right side out and you are finished!


Market totes are so hip right now!  I use mine almost every day just throwing things in there that I need to do that day, like library books, coupons, packages to mail, etc.  I recently gave one to a friend for her daughter's birthday and she loved it!  And so did her sister, who said she wanted one too!

I have to thank Anne from Anne Michelle Designs who graciously walked me step by step through this when I purchased some market totes from her.  THANK YOU!

If you don't have an embroidery machine and would like a personalized market tote visit my website at http://www.sewyours.blogger.com/ to purchase one today!

Thursday, April 22, 2010

Monogrammed Towels

This is my first embroidery tutorial post and I'm both excited and nervous! [eek!]  Once I got my embroidery machine last fall the very first thing I did was monogram some towels for Christmas presents.  Everytime I sit down with a new embroidery blank (t-shirt, diaper cover, market tote, etc.) I get nervous because I just don't want to mess anything up!  I usually go to AK Designs Boutique's Yahoo Group and ask for some help...they are always willing to help!  Once I get enough confidence I go and try it myself. So here are some pointers that may help you when you get ready to embroider on a towel.  I have the Brother PE-750D machine and I absolutely LOVE it!

Things you will need: towel, embroidery thread, a light or medium weight tearaway stabilizer, spray adhesive (I use Sulky Temporary Spray Adhesive- 3-3/5 oz.), water soluable solvy topper (I use the one I purchased at the dealer where I purchased my machine), and disappearing ink marker.


First hoop the stabilizer, making sure there is no wrinkles or extra slack once it is hooped. 
 (I will post on hooping 101 soon).


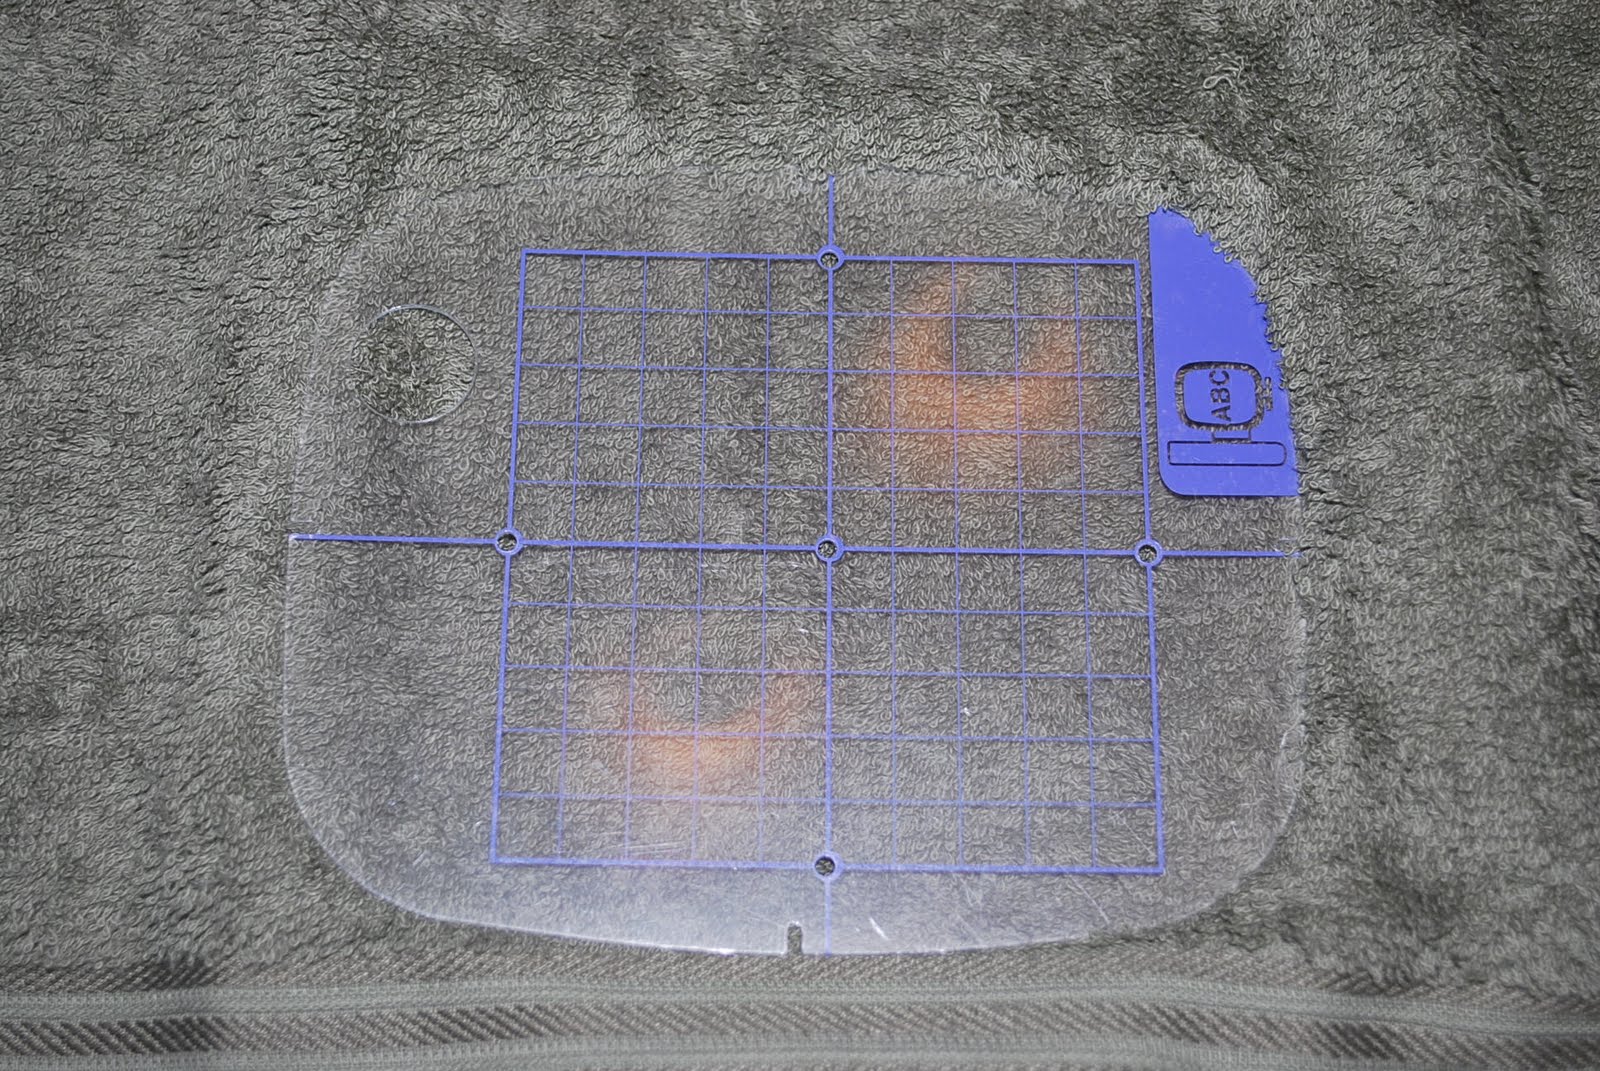
Next, find the middle of your towel by folding it exactly in half lengthwise and marking with the disappearing ink marker.  Lay the towel over the hooped stabilizer, lining up your center mark as best as you can for a starting point.  I used my marker to show you the center.


Lay your clear ruler grid on top of  your towel, lining up the middle mark on the towel with the middle line of the grid.  Once your middle mark is in place then make sure the edge of the towel is straight and this is your final placement of the towel.

Fold the towel over in half and spray the stabilizer with the spray adhesive.  Return the towel to the flat position and press firmly on the towel where you applied the adhesive.  Next, fold the towel over the other way and spray the other side with spray adhesive and again press firmly.


It is difficult to see in this picture but you can basically see the outline of the hoop beneath the towel because it is pressed onto the stablizer.


When a blank has a pile (little loops in the pattern of the towel), specifically like towels do you need a "topper" to hold down the pile so that your design will stitch evenly and not get caught in the pile.  Cut an area of water soluable solvy and place on top.  Some people will pin this down I simply hold it down with my fingers until there are enough stitches done so that it will not move. 
WARNING: do not get your fingers caught in the path of the needle!


Insert the hoop into your machine.  Trace the perimeter of your design so you have an idea of where to place the solvy.


Begin stitching the design.


Once the design is finished stitching, remove the hoop from your machine.  Pull the backside of towel from the stabilizer.  This is the beauty of tearaway stabilizer, you literally tear it away!


Next tear away the solvy topper.  Any remaining topper may be removed by applying a small about of water to the pieces.  Most of it should come off simply by pulling it off.  Here is your finished monogrammed towel.  An easy, inexpensive gift that is alway appreciated!


Have any questions or suggestions?  Please leave a comment!


Tuesday, April 20, 2010

Great Places for Embroidery Fonts and Designs

I spend hours searching the internet for all kinds of things!  When I got into embroidery I was looking for the least expensive designs and fonts.  I'd love to share some of my favorites with you!  I will update this frequently when I have new finds.

FONTS
  1.  8 Claws and a Paw - they have fonts from $2.95 that includes multiple sizes (usually 1 in, 2 in, 3 in and 4 in).  They also offer a month subscription to download any fonts they offer on their site.  What a deal!  They update their fonts regularly.
  2. Jolson's Designs - fonts are only $3 and include multiple sizes (usually 1 in, 2 in, 3 in and 4 in). They give you the heads up if letters in their 4" set may need a 5" x 7" hoop, which is helpful.
  3. AK Designs Boutique - very cute & trendy fonts, and her designs are exceptional.  Like her page on Faecebook and get alerts for sales!  They also have a yahoo group that is extremely helpful and Angie, owner, is an active participant and she offers free monthly designs here as well.

APPLIQUE DESIGNS
  1. Planet Applique - this site has the cutest applique designs and they start at just $.99!  Wow!  They also have a Yahoo Group that is very helpful and they offer monthly freebie designs there too.

FREEBIES
  1. Embroider This! - over 200 free embroidery designs and affordable embroidery blanks.  They have a sister site Wholesale Linens that offers the same embroidery blanks but at wholesale prices but you have to have a tax ID# and must complete the wholesale application.

Embroidery 101

I have only been begging for an embroidery machine since the birth of our first daughter, over 2 years ago and 2 months before our second daughter was born I got one!  Having kids makes embroidery so fun but I have found is that I do more embroidering for myself or friends than I do for my kids, which I would not have thought would be the case. 

MACHINE

After talking to several people that had machines, visiting a local brother dealer and knowing my budget ($2,000 for EVERYTHING) I decided on the Brother PE-750D. I was pretty sure I wanted at least a 5" x 7" embroidery area and I liked the idea of being able to stitch Disney designs for my kiddos and this machine fit the bill. Now I would have liked the sewing/embroidery combo (the Innovis models), mainly just so I would not have to have 2 machines, but I would have had to double the cost and I was just fine having two machines; I mean I was not even sure how much I would use it at that point. The nice thing about my dealer is that I have 1 year and if I want to trade up I can do so with 100% credit for the price I paid for my machine.


EVERYTHING ELSE
When you set a budget for an embroidery machine there are a lot of things that you need to keep in mind because it is not like a sewing machine in that once you have it you are good to go.  Most of your budget will go to the "other" things you will need.  


 Hoops
First, I would suggest additional hoops.  The machine comes with a 5" x 7 " hoop but having additional sizes make certain designs easier, saves on stabilizers, and allows you to hoop something while you are embroidering.  I bought the Elipse 4-Hoop Embroidery Package for $100.  It comes with the following hoops: 1"x 2 1/2",  4" x 4", 5" x 7", 5" x 12".  Even though the embroidery area is limited to 5" x 7", the 5" x 12" hoop can be used if you "split" the design with your embroidery software.  Plus, you get some thread and pair of scissors.


Thread
My dealer sells the Sulky brand thread, but it was a bit out of my price range as I was trying to stretch my budget as far as I could.  I decided to purchase the Coats and Clark Embroidery Thread at Joann's.  They were $5.99 each but were on sale for buy one get one free, so like $3 each.  I picked out about 20 spools of various colors of thread to get me started.  I have also heard very good things about the Madeira thread too, just have not tried it yet.


Stabilizer
My dealer suggested a light weight tear-away stabilizer because it has so many uses so I purchased a roll of it as well as a roll of a water soluble solvy topper stabilizer because I knew I wanted to embroider some towels.


Adhesive
For hoopless embroidery a spray adhesive is essential.  I used a 40% off coupon at Hobby Lobby to purchase Sulky Temporary Spray Adhesive KK2000 because it was $14.99!  I have also heard that 505 Adhesive is also good.


Designs and Fonts
The machine comes with a couple of fonts to start with but I wanted the cute ones so I purchased several from different websites.  See my posting on fonts and designs.  The prices of fonts and designs varies greatly from site to site.  The first thing I did was to search "free embroidery designs" to see what I could find out there to help me practice.  There are some cute FREE designs out there, you just have to scurry the web looking for them.  I purchase all my designs from online sites.


Blanks
Embroidery blanks are simply items you can embroider on.  Examples include totes, shirts/onesies, towels, aprons, bibs, etc.  The prices on these can vary greatly too.  I am fortunate to have a tax ID number so I applied for wholesale accounts at several online vendors to purchase some blanks to start.  Some sites will allow you to purchase with wholesale prices with a minimum buy even if you don't have a tax ID.  My favorite sites are:

Yahoo Groups
I highly suggest joining a yahoo group for embroidery.  I have learned almost everything I know from reading and asking questions on these groups.  Everyone is so helpful!!  Finding a good support group will help you to have the confidence to try new things.  Depending upon your settings you can get summary emails that list all the messages in a day or you can get each message sent to your email.
Ok, so that is all I can think of right now but I will be adding to this as I think of more things that might be helpful if you are thinking about embroidery or if you are just starting out. 

Lettuce Edge Hem: Onesie to T-shirt in 5 minutes

Hello my name is Sara and I'm a Gymboree addict!  However, I buy everything on sale, dirt cheap at the end of the season in the size I think my little ones will be next year.  So last year when I bought the 2T onesie I guess I wasn't thinking that my daughter was going to be potty trained and how inconvenient a onesie might be on a two year old.  When I saw this tutorial at Helping Little Hands I knew what I needed to do.  Now I did practice this technique on a stained onesie before I attempted to change my daughter's shirt.  It is very easy and once you get the hang of how your machine will feeds, the zig zag stitch you will be good to go.  Plus sewing on knit was new to me!

I started with this...


And ended up with this...


First, lay your onesie flat and line up the Fiskars Clear Acrylic Quilting Ruler with the bottom of the onesie, just above the top of the legs.  Using the Fiskars Rotary Cutter  simply trim the bottom part of the onesie.  By the way I use my Fiskars 3-Piece Quilting Set almost everyday!  I think I bought it at Joann's with a coupon or something but it really makes cutting fabrics for projects much easier and helps me to make my lines straighter, which I need a lot of help with!


I would trim as close as possible to the top of the legs on the onesie if you want the shirt to be a decent length.  I probably cut mine a bit too short and would prefer that my daughter's shirt be a little longer but lesson learned for next time.  Also, remember you can alway trim off more later, you can't add it back!

Next set your sewing machine to the zig zag stitch with the widest stitch and the shortest length.  Line the fabric up like this...


I pulled the knit t-shirt from the front and the back to stretch it as far as it would go in order to make the lettuce edge hem as ruffly (is that a word?) as I could get it.  Just be careful to not pull too far from the backside as to pull your stitch.

Sew all the way around and this is what your lettuce edge hem will look like...


So easy, literally took me like less than 10 minutes, even with the trial run on the old onesie, and oh so cute!


Thank you Helping Little Hands for the idea!


Tried the lettuce edge hem?  Tell me about it!

Shared on

Monday, April 12, 2010

Fast, No Cook Homemade Strawberry Jam


Since it is Spring and the best fruits are on sale in the grocery store I thought I would make a batch of my homemade Strawberry Freezer Jam and share with you!


You will need 3-4 lbs of fresh strawberries, Ball Freezer Jam Fruit Pectin, 1 1/2 cups of sugar.

Clean and remove the stems and hull of the strawberries.


Cut the strawberries in halves or quarters then mash with a potato masher.  You will have to do this in several batches {it took me 3 batches}.  You will get a very juicy mixture like this...


In a separate bowl stir the Ball Freezer Jam Fruit Pectin with 1 1/2 cups of granulated Sugar.

Next, stir in the crushed/mashed strawberries.  Continue mixing for about 3 minutes.  Fill clean jars with the strawberry jam {don't fill them too high because when you freeze them the contents will expand and may leak out}.  Allow the jars to sit for about 30 minutes so that it will thicken.  Now if you have never had homemade jam it is not as thick as the store bought kind but it is much better tasting!

 I used a combination of  Ball pint wide-mouth glass jars and Ball pint (8 oz) plastic freezer jars.  With 3 pounds of strawberries I was able to make almost 8 pints of jam.  I plan on giving my photographer one tomorrow and maybe share a couple with the neighbors.


Freezer jam will stay good for 1 year in the freezer or up to 3 weeks in the refrigerator.  The great thing I love about this receipe, which by the way I found in Parents Magazine last year, is that you can control the amount of sugar in the jam you put in your PB&J's, on toast or wherever you like jam!!  This receipe uses less than half of the sugar found in store bought jellies and jams and it's so easy!!!