
Showing posts with label Cooking. Show all posts
Showing posts with label Cooking. Show all posts
Monday, September 19, 2011
Lunch Choices Menu
Is it just me or when it comes time for me to pack lunches in the morning I have a complete brain fart and can't remember what I have or what I want to put together in my kids' lunches. I can't give apples and applesauce or PB&J and peanut butter pretzles!!! So I came up with a quick picture lunch menu where my daughter can choose one from each catagory that coorasponds to the food pyramid or food plate or whatever they want to call it today.


Saturday, October 30, 2010
Mexican Enchillada Casserole
A friend of mine's Uncle was recently diagnosed with stage 4 cancer and has been commuting to Oklahoma City for Chemo treatments weekly leaving his poor wife at home with his 4 boys. So I decided to bring them a couple of casserole meals that can be frozen or cooked that night depending upon their schedule.
The first casserole meal is one of my favorites from growing up! Mexican Enchillada Casserole! Yummy!
1 lb. Ground Beef
1 pkg. of Taco Seasoning
1 can of Wolf Brand Chili or your favorite chili
1 can of Ro-tel Tomatoes (drained)
Velvetta Cheese
Corn Tortillas
1 small chopped Onion
Vegetable Oil
First start by browning the ground beef and seasoning with taco seasoning per the directions on the package. Drain off any excess oil or water. Combine seasoned ground beef with the can of Wolf Brand Chili and Ro-tel tomatoes. This is your filling.
Cut slices of velvetta approximately 1/2" thick. Then cut each slice into thirds or fourths, making cheese sticks. You will need approximately 4-5 slices.
If your corn tortillas are soft and pliable you can skip this step. If they are not simply heat about 1/2 teaspoon of vegetable oil on medium heat in a small skillet. Heat tortilla and oil for approximately 15-30 seconds on each side.
Remove the tortilla from the skillet and place in the bottom of a casserole dish, preferrably with high walls or a 9x9 baking dish will also work. Continue until you have the bottom layer of the dish covered with soft corn tortillas (approximately 4). Now use 1/3 of the chili filling, spread it evenly on the tortillas. Throw in a handful of onions, if you like them. Next space 4-5 cheese sticks evenly on the filling. Now repeat with the soft tortillas, chili filling, onions and cheese 2 more times.
Cover with foil and bake at 350 for approximately 20-30 minutes or until the tortillas are soft like enchilladas. Remove from the oven and let sit for approximately 10 minutes before serving.
You can also freeze this receipe to be eatten at a later date...You know those nights that you don't feel like cooking...I know I do! If you freeze it I usually put it directly in the oven from the freezer and cook for 45-60 minutes, but check on it regularly. When the casserole is bubbly you know its ready!
The first casserole meal is one of my favorites from growing up! Mexican Enchillada Casserole! Yummy!
1 lb. Ground Beef
1 pkg. of Taco Seasoning
1 can of Wolf Brand Chili or your favorite chili
1 can of Ro-tel Tomatoes (drained)
Velvetta Cheese
Corn Tortillas
1 small chopped Onion
Vegetable Oil
First start by browning the ground beef and seasoning with taco seasoning per the directions on the package. Drain off any excess oil or water. Combine seasoned ground beef with the can of Wolf Brand Chili and Ro-tel tomatoes. This is your filling.
Cut slices of velvetta approximately 1/2" thick. Then cut each slice into thirds or fourths, making cheese sticks. You will need approximately 4-5 slices.
If your corn tortillas are soft and pliable you can skip this step. If they are not simply heat about 1/2 teaspoon of vegetable oil on medium heat in a small skillet. Heat tortilla and oil for approximately 15-30 seconds on each side.
Remove the tortilla from the skillet and place in the bottom of a casserole dish, preferrably with high walls or a 9x9 baking dish will also work. Continue until you have the bottom layer of the dish covered with soft corn tortillas (approximately 4). Now use 1/3 of the chili filling, spread it evenly on the tortillas. Throw in a handful of onions, if you like them. Next space 4-5 cheese sticks evenly on the filling. Now repeat with the soft tortillas, chili filling, onions and cheese 2 more times.
Cover with foil and bake at 350 for approximately 20-30 minutes or until the tortillas are soft like enchilladas. Remove from the oven and let sit for approximately 10 minutes before serving.
You can also freeze this receipe to be eatten at a later date...You know those nights that you don't feel like cooking...I know I do! If you freeze it I usually put it directly in the oven from the freezer and cook for 45-60 minutes, but check on it regularly. When the casserole is bubbly you know its ready!
Wednesday, October 27, 2010
Rotisserie-Style Crockpot Chicken
I've been really, really busy recently with my other business Girly Girlz Bows so I haven't had a lot of time to go grocery shopping. Oops! Never fear I had a whole chicken in the freezer, a crockpot and I'm good to go!
I've mentioned A Year of Slowclooking before but I {HEART} this website! I've gotten so many good receipes from her suggestions and they are EASY, EASY, EASY and DELICOUS!
Today I'm using her Rotisserie-Style Crockpot Chicken that I would like to share...
Take one whole, thawed (if you froze it) chicken. I remove all of the insides that I'd rather not describe...you know what I'm talking about, right? I also take a small knife and cut underneath the skin to remove all of the skin. Yuck! I didn't want to touch anything for hours after pawing that chicken but it makes for a healthier chicken and not so much grease in the crockpot.
Next rinse the bird good; inside and out. Pat dry with a paper towel. Now let's season up this bird!
Let's start with one side and we will do the same the other after this side is fully seasoned. I liberally apply salt and pepper to the breast side of the chicken. Next I cover the bird with a light coating of Seasoned Salt and Onion Powder. Turn the bird over so the breast side is down and reapply the seasoning. Finally I stuff the inside of the bird with about 1/2 an onion and throw in about 3 tablespoons of minced garlic right on top of the bird. All done! :)
Cover and cook on low for 8 hours or on high for 4-5 hours. Enjoy!
I've mentioned A Year of Slowclooking before but I {HEART} this website! I've gotten so many good receipes from her suggestions and they are EASY, EASY, EASY and DELICOUS!
Today I'm using her Rotisserie-Style Crockpot Chicken that I would like to share...
Take one whole, thawed (if you froze it) chicken. I remove all of the insides that I'd rather not describe...you know what I'm talking about, right? I also take a small knife and cut underneath the skin to remove all of the skin. Yuck! I didn't want to touch anything for hours after pawing that chicken but it makes for a healthier chicken and not so much grease in the crockpot.
Next rinse the bird good; inside and out. Pat dry with a paper towel. Now let's season up this bird!
Let's start with one side and we will do the same the other after this side is fully seasoned. I liberally apply salt and pepper to the breast side of the chicken. Next I cover the bird with a light coating of Seasoned Salt and Onion Powder. Turn the bird over so the breast side is down and reapply the seasoning. Finally I stuff the inside of the bird with about 1/2 an onion and throw in about 3 tablespoons of minced garlic right on top of the bird. All done! :)
Cover and cook on low for 8 hours or on high for 4-5 hours. Enjoy!
Saturday, October 2, 2010
Ice Cream Cupcakes

For my daughter's 3rd birthday I decided to make ice cream cupcakes. Do you remember these from when you were little? The thought of them brings me back to the days when all you had to worry about was what you were going to have for lunch! Anyways, since she is getting to an age of independance, where she wants to do everything herself I thought these would be perfect for her party!

Things you will need:
Cake Mix
Ice Cream Cups (with a flat bottom)
Applesauce
After much research I decided to replace the 1/3 cup vegetable oil that was needed for the cake mix with just about 1/3 cup of apple sauce. I used Mott's All Natural (no sugar added). I mixed the cake mix according to the directions on the box, with the applesauce substitue.
Betty's Way
Next, I prepared 3 ice cream cone cupcakes Betty's way. This called for placing cupcake liner in a muffin baking pan. I took an ice cream scoop and filled the liner about 2/3 of the way full. Place the ice cream cone gently on top. Don't push the cake batter up into the cone (like I did on 2 of them) because it will make a not-so-pretty cake mark on the rim of your cone. Just gently place the cone on top.

Sara's Way
Place an ice cream cone in the muffin tin. Using the ice cream scoop, fill the cone about 2/3 to 3/4 of the way full.

I baked these for about 18 minutes (iniitally set the timer for 15 minutes) and keep adding time until I could stick with a toothpick and it came out clean.
The RESULTS
Appearance
When grading these on appearance I will have to say my way produced a cleaner finished product. In my cones I filled them about 2/3 of the way full, next time I will add a little more batter to each cone so that it will rise to the top of the cone. Betty's way left the top of the ice cream cone with a harden brown crust (similar to what you would see on the bottom of a cup cake. From some of the reviews on her site people commented that the cones were top heavy due to the way these were cooked but I didn't find that at all. I found them to be about the same as my way. However when I removed the cupcake liner from Betty's way some of the cake actually came off too, making it a difficult surface to apply the icing.

Betty's Way

Sara's Way
Taste & Texture
With an unanimous vote, my way won again. These cupcakes were far more moist and delicate, as opposed to Betty's way where the cupcakes were tougher at the top due to the harden crust-like finish.
The Verdict
It looks like I might have a one up on good ol' Betty Crocker! But you know, my testers and I may just have been a little biased so you try your own experiement and let me know which way you prefer!

Friday, July 9, 2010
Chocolate Pudding Pie

Original Receipe:
Crust
11 x13" pyrex dish
2 sticks of butter
2 cups of flour
1/2 cup of pecans
Mix till crumbly. Bake at 350 for 15 min. Let cool.
Cheese Filling
1 8 oz. package of cream cheese-soft
1 cup powder sugar
1 cup of cool whip
Mix and spread on crust.
Pudding Filling
3 small (3.9 oz.) packages of instant choclate pudding
3 cups of milk
1 cup of cool whip
Mix pudding, Fold in cool whip. Spread over cream cheese mixture.
Top with cool whip.
Suggested to buy 1 lrg. and 1 sml. cool whip containers to make this dessert.
My redenition:
I modified it slightly because I wanted something quick and easy so I bought a prepared shortbread pie crust in the baking aisle. This brought on another issue that this receipe made too much filling for a pie pan so I had to cut it down.
I used 1 8 oz. package of Neufchatel Cheese (1/3 less fat) put probably could have gotten away with using 4-6 oz. and cutting back the powdered sugar accordingly. In addition, I used only 1 small package of instant chocolate pudding (not because I wanted to but because I accidently grabbed 1 package of cook & serve and 1 package of instant) mixed with 1 cup of milk.
Needless to say it was a hit with my family and it took me all of about 15 minutes! Enjoy!


Sunday, June 6, 2010
Ham and Cheese in Puff Pastry
I am a little obsessed with the Food Network! I just don't have the time to watch it as much as I wish but I did have time to catch Ina Garten and love to share this recipe with you. I'm not a huge fan of ham but the Ham and Cheese in Puff Pastry just sounded too good (and it is). Did I mention it is E-A-S-Y?


Since it is just my husband and I who would eat this (my daughter doesn't like mustard) I changed up the receipe a bit so here is what Idid...
Instead of using 2 pieces of puff pastry I used just 1 piece and folded it in half to make the pastry. Also, I had some leftover frozen ham from Easter in the freezer so I diced it up in bite sized pieces and used it instead of the sliced deli ham. This gave me 3 servings, which is just perfect for us because I don't like left-overs.

Tuesday, June 1, 2010
No More Black Guacamole...
How much do you hate it when you make a killer guacamole dip but you can't keep it because no one likes black guacamole the next day??? Well there is a way to save it!
Avocados turn brown or black due to oxygen hitting the surface, so save your guacamole by taking a small piece of cling film like Saran Wrap and press it completely to the top of your guacamole, making sure to seal the edges well.
and press it completely to the top of your guacamole, making sure to seal the edges well.Guacamole that has been stored in the refrigerator for 3 days...

Stir it up and you are good to go!


Eggs Rolls and Goyza (Potstickers)
Using the crock pot roasted chicken breasts simply chop the chicken so that it is in mini bite sized pieces. When you cut it some of the chicken will actually shread, it's ok! I used about 1 breast for 7 eggrolls and 21 goyza!

Next, in a skillet add about 1-1 1/2 cups of shredded cabbage and 3/4-1 cup of the Trinity. You may think it is too much cabbage but it will cook way down, so don't you worry your pretty little head!

Let the mixture cook down for about 10-15 minutes, stirring occassionaly. The cabbage will become opaque and soft. Add the chicken and I also added about 7 chopped shrimp.

Using egg roll wrappers located in the produce section of your grocery store, now you are ready to roll your egg rolls...
Place about 2 tablespoons of your filling mixture in the center of the wrapper.

2. Fold the sides in and wrap up the bottom edge it tight around the mixture, rolling it all the way up. Before you get to the end apply a dab of water to the corner of the wrapper so that it will stick and stay closed once you finish rolling it.

To cook: Heat a pot aobut 1/3-1/2 full of oil. Fry the egg rolls until they turn golden brown. If you are going to freeze the eggrolls cook to a light golden brown color because when you reheat them in the oven they will cook more and you don't want them overcooked.
Using the goyza or potsticker circular wrappers, also found in the produce department at your grocery store fill with about 1 teaspoon of filling. Dab your finger in water and rub around the circumference of the circle.

Fold in half and press the edges together.
To cook:

I quickly made 7 egg rolls and 21 goyza (potstickers). Perfect as a meal by themselves or appetizer.
Thursday, May 27, 2010
Crockpot Chicken
Have you ever watched Robin Miller on the Food Network? Well she takes a set number of ingrediants and cooks them one night to use them for a couple other meals throughout the week. So I used Robin Miller's style cooking today!
A Year of Slow Cooking is a great blog if you have not checked it out. In 2008 she made something in her crock pot every day so she had 365 receipes in 2008 alone! So maybe she has slowed down and is now only posting one every couple of days but if you have ever wondered by you registered for the crock pot on your wedding registry well she will have something you will love to make! Today I am using her shredded chicken receipe as a guide.
First I started by taking a package of bone-in chicken breasts. I removed the skins because my husband hates chicken fat, well I do to when I come to think of it...Anyways, liberally apply salt and pepper. Throw them bone side down into a crock pot. Turn on low for 5-6 hours. I didn't add any liquid this time but next time I may add about 1/2-1 cup of water as my breasts didn't make as much liquid (broth) as I would have liked.


With these 3 chicken breasts I will make Chicken Spaghetti, Chicken Salad Sandwiches, Chicken & Shrimp Eggrolls and Goyza (Potstickers)!
Tuesday, May 25, 2010
The Trinity
My Mom is one of the best cooks I know! She would make the trinity by the skillet full and use it in everything so I started doing the same thing. I hate, hate, hate to waste food. So tonight when I was going through my fridge I saw a bunch of celery that was about to go bad and a half full bag of baby carrots that may have expired 2 weeks ago but.....I'm still going to use them! It was time to make a batch of the Trinity. I've seen Emeril refer to the trinity as onion, celery and green bell pepper but ours is different. It's BETTER!
1. Slice the baby carrots.

2. Chop the celery

3. Chop the onion

4. Add about 1 tablespoon of olive oil to the skillet on medium heat. Cook the carrots for about 5-8 minutes. Add the celery, cook for about 5-8 minutes later. Lastly, add the onion and cook for about 10 minutes. You will see the celery turn bright green and carrots bright orange. Continue cooking until the onions and celery are opaque. Cooking at all stages does not require your complete attention. I made mine while loading the dishwasher, putting up dinner, etc. Just check on it every couple of minutes and give it a stir. The Trinity will reduce by 1/3 - 1/2 when cooked. When you start with this...

You will end up with this...

I freeze the Trinity in quart sized freezer bags and just break off a corner or two and throw it into spaghetti, stir fry, egg rolls, rice, soups, you name it! We don't eat enough veggies and this is a great way to disguise them in something my family loves!

Shared on

Sunday, May 9, 2010
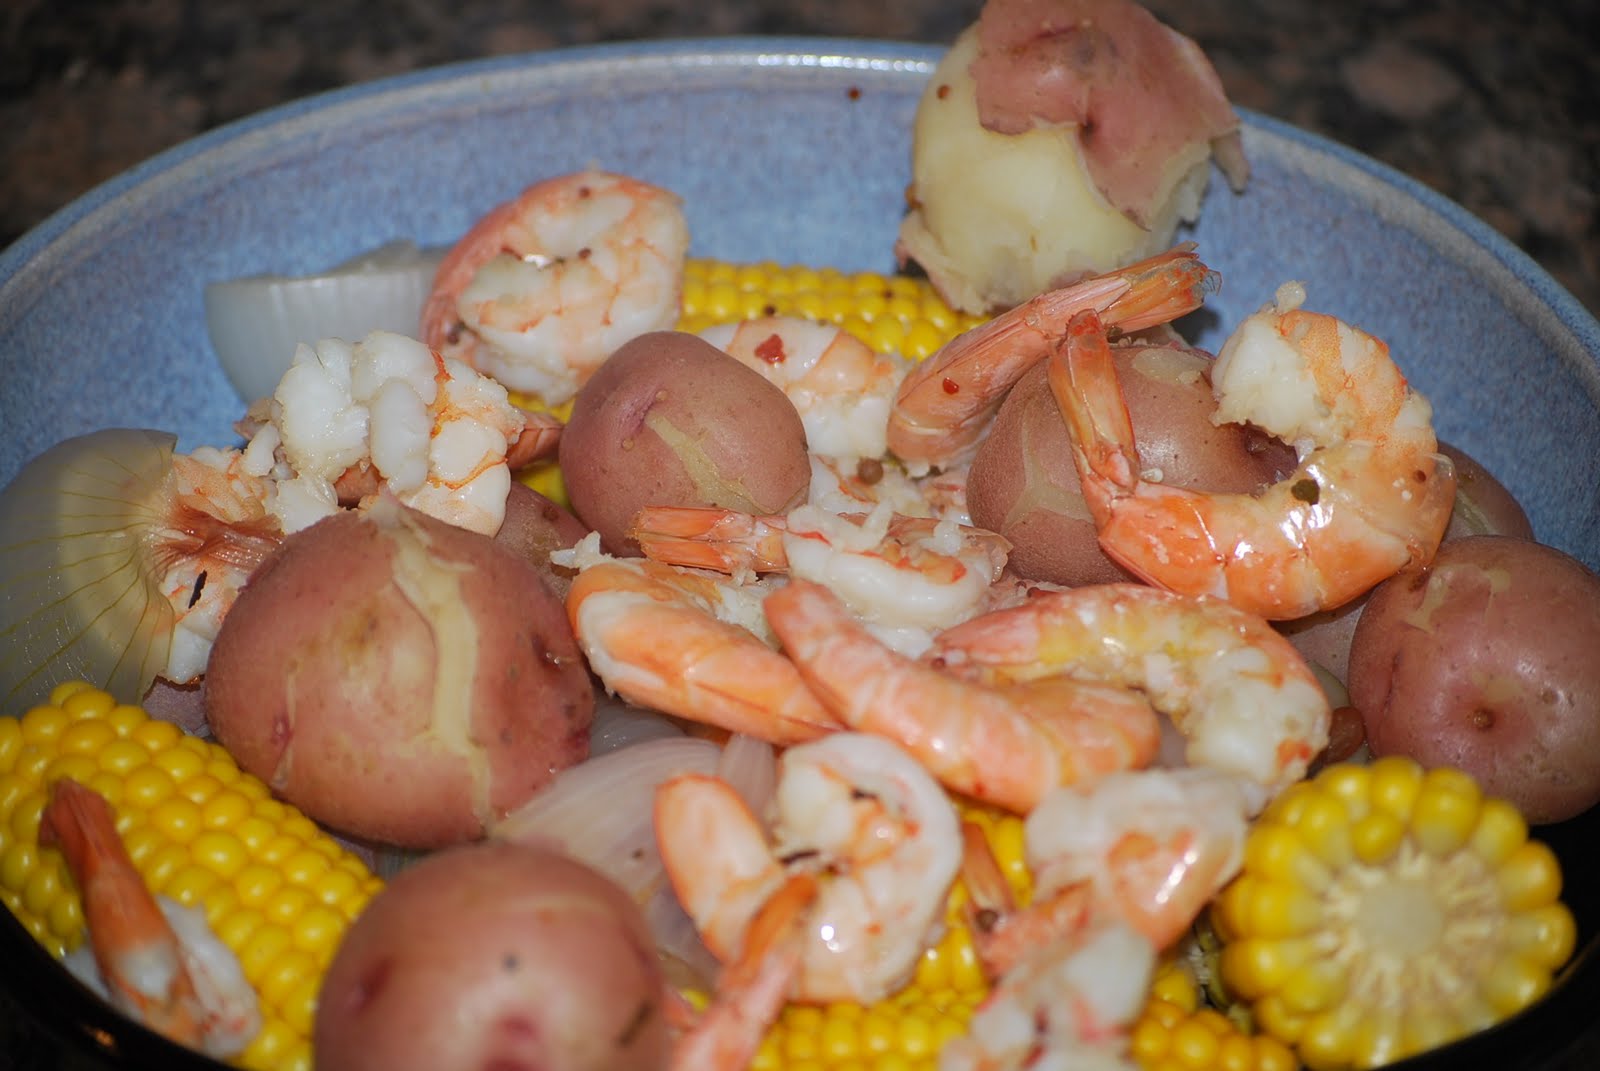
Shrimp Boil with Corn and Potatoes
It's CRAWFISH Season here in Texas and I HEART the smell of fresh crawfish, corn and potatoes but sometime after my first daughter I just lost the craving for crawfish and it hasn't come back yet. They say your tastebuds change once every seven years, guess it will be awhile! So in the meantime I decided to have a shrimp boil with corn and potatoes!

2 lbs. of red potatoes
1 1/2 lbs. of large shrimp
3 ears of corn, shucked and halved
1 medium onion, halved
3-4 cloves of garlic, smashed
1 lemon, halved


2 lbs. of red potatoes
1 1/2 lbs. of large shrimp
3 ears of corn, shucked and halved
1 medium onion, halved
3-4 cloves of garlic, smashed
1 lemon, halved
- Clean and scrub the small red potatoes. Bring 5 quarts of water to a boil with both halves of medium onion, a lemon halfed and juiced, cloves of garlic and seafood boil season package.
- Add potatoes to the pot. Reduce heat and simmer about 20 minutes until almost done. Add corn and continue cooking for 5-7 more minutes.
- Remove from heat. Add shrimp, making sure they are submurged and cover to continue cooking for 2-3 minutes.
- Drain the liquid. Serve on a large platter. Melted butter and some cayanne pepper are extras that always accompany this meal. Perfect Mother's Day meal!
Monday, April 12, 2010
Fast, No Cook Homemade Strawberry Jam
Since it is Spring and the best fruits are on sale in the grocery store I thought I would make a batch of my homemade Strawberry Freezer Jam and share with you!

You will need 3-4 lbs of fresh strawberries, Ball Freezer Jam Fruit Pectin , 1 1/2 cups of sugar.
, 1 1/2 cups of sugar.Clean and remove the stems and hull of the strawberries.

Cut the strawberries in halves or quarters then mash with a potato masher. You will have to do this in several batches {it took me 3 batches}. You will get a very juicy mixture like this...

In a separate bowl stir the Ball Freezer Jam Fruit Pectin with 1 1/2 cups of granulated Sugar.
with 1 1/2 cups of granulated Sugar.Next, stir in the crushed/mashed strawberries. Continue mixing for about 3 minutes. Fill clean jars with the strawberry jam {don't fill them too high because when you freeze them the contents will expand and may leak out}. Allow the jars to sit for about 30 minutes so that it will thicken. Now if you have never had homemade jam it is not as thick as the store bought kind but it is much better tasting!
I used a combination of Ball pint wide-mouth glass jars and Ball pint (8 oz) plastic freezer jars. With 3 pounds of strawberries I was able to make almost 8 pints of jam. I plan on giving my photographer one tomorrow and maybe share a couple with the neighbors.

Freezer jam will stay good for 1 year in the freezer or up to 3 weeks in the refrigerator. The great thing I love about this receipe, which by the way I found in Parents Magazine last year, is that you can control the amount of sugar in the jam you put in your PB&J's, on toast or wherever you like jam!! This receipe uses less than half of the sugar found in store bought jellies and jams and it's so easy!!!
last year, is that you can control the amount of sugar in the jam you put in your PB&J's, on toast or wherever you like jam!! This receipe uses less than half of the sugar found in store bought jellies and jams and it's so easy!!!
Saturday, April 10, 2010
Aunt Barbara's Banana Nut Bread
When you see these...

You know it's time for BANANA NUT BREAD! I HEART banana nut bread!!
My Aunt Barbara's Banana Nut Bread is our famous family receipe that has been shared with many people, including Willie Nelson (who by the way, like it!) Shhhh, don't tell my family that I'm sharing this with the world or they may just kick me out! {smile}


You know it's time for BANANA NUT BREAD! I HEART banana nut bread!!
My Aunt Barbara's Banana Nut Bread is our famous family receipe that has been shared with many people, including Willie Nelson (who by the way, like it!) Shhhh, don't tell my family that I'm sharing this with the world or they may just kick me out! {smile}

1 1/2 cups Sugar
1/2 cup Butter (1 stick)-melted
2 cups Flour
1 teaspoon Soda
2 Eggs
4 tablespoons Buttermilk (alt. receipe below)
1 teaspoon Vanilla
3 Bananas (very, very ripe)
1 cup Pecans - chopped
Combine sugar and butter in stand mixer . Add eggs and beat well. Smash the bananas and stir into mixture. Add flour alternately with the buttermilk. Lastly fold in the nuts.
. Add eggs and beat well. Smash the bananas and stir into mixture. Add flour alternately with the buttermilk. Lastly fold in the nuts.
Bake in a greases and floured bunt pan or 2 loaf pans for 40-50 minutes at 350 degrees. Allow to cool 10 minutes in the pan.

Buttermilk Substitute
Combine 1/2 cup milk with 1 1/2 teaspoon of vinegar or lemon juice.
I hope your family will enjoy this receipe just as much as we have over the years! By the way, you can easily freeze all of half of this banana bread and it is wonderful when thawed for a treat later.

Thursday, April 8, 2010
Buying in Bulk- The Do's and Don'ts
So I have memberships to Sam's Club and Costco and try to buy in bulk when it makes sense for our family but here are some things that you should not buy in bulk that I would have never know so I thought I would share!
 Brown Rice

Many consumers assume brown rice to be a good, staple item to keep in the cupboard at all times. What they might not know is that brown rice has a short shelf life due to its oil content. If you plan to store something like brown rice, keep it in your refrigerator.

Nuts can be pricey and are sometimes cheaper to buy in bulk, but before you put them in your pouch, remember that they'll only last one to two months. A high fat content forces them to expire quickly. If you're going to purchase a large quantity, buy roasted nuts since they last longer than raw ones.

Unless you're eating ketchup and mayonaise at every meal or hosting a huge party in the near future, it's probably not worth your money to buy condiments in bulk. Plus, these items only last six months to a year.

Experiment with vitamins before you consider buying more than one bottle at a time. What if you have an unforseen reaction, or you simply become bored with that strawberry-flavored protein shake mix?

Don't buy bleach in bulk unless you're using it all the time. The chemical product actually starts to degrade after six months.

Spices
Spices can lose their potency as quickly as six months after they are purchased. Unless you're cooking with spices frequently, it's best not to buy them in bulk.

Ice Cream
While you may be inclinded to buy big on this one just remember your freezer is only so big. Plus, ice cream is actually cheaper to buy individually, such as in half-gallons, in some stores.


Subscribe to:
Posts (Atom)